
Big Stick Gradient Heart Art Manicure – Bundle Monster Plate 317
Hello Beauties!
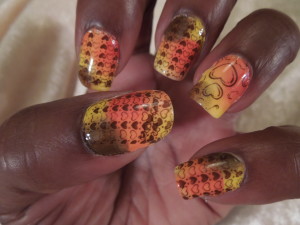 This week’s manicure was inspired by eunique nails’ video tutorial and my desire to work with cream polishes. In her tutorial, she created a rainbow gradient under the water marbling. I wanted to do something similar, of course, using the colors in my color palette. Most of my gradients have been done using shimmer polishes or some combination of shimmer and cream. So I used all creams, and rather than doing water marbling (which I haven’t tried yet), I wanted to stamp an image on top.
Here’s what I did:
- After my base coat, I did two coats of white.
- I used four colors (China Glaze Happy Go Lucky, OPI In My Back Pocket, OPI Brights Power, and China Glaze Mahogany Magic) in three color combinations. I arranged the three color combinations on three make-up sponges and then cycled through the sponges to apply the combinations to my nails to create the gradient (see below for notes on this step). I repeated this step twice, and then where necessary, I added another coat to get the gradient to the right opacity.
- I used Konad Special Princess Chocolate polish to do the stamping, and I used two images on Bundle Monster image plate 317.
- Then I finished with a coat of Sally Hansen Triple Strong and Seche Vite as my top coat.
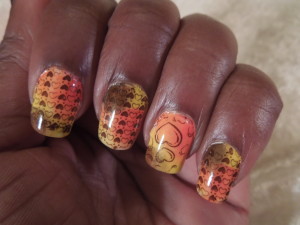
This week I was walking to lunch with a friend and I was saying something to her. I typically talk with my hands, so after I said what I said, my friend commented that she didn’t hear a word I said because she was completely distracted by my nails. She said my manicure reminded her of a Big Stick from her youth. Do you remember those??? I loved Big Sticks! Anyway, I loved the reference and totally named the manicure based on her comment. Thanks MsTai!!
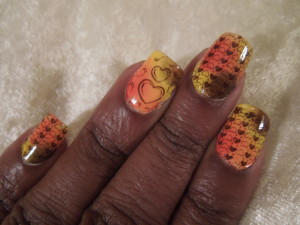
As the novice, I’m always thrilled with what I learn from every new design. I put my major takeaways in my weekly lessons, but I’ll just mention here that it’s important not to judge the manicure before it’s complete. I changed direction on this manicure mid-stream because it didn’t look like the gradient was going to be very attractive beneath the image. So what I’d originally planned to do as the main image, I used instead as the accent nail, and vice versa. I should have stuck with my original plan because the accent nail is my favorite part of this manicure.
Note on Step 2: What I’d envisioned with the gradient was more a 6-square tile pattern, similar to the Shades of Brown Tile Gradient. But because I chose four colors to do six tiles, the lines ended up being less distinct and the pattern looked more random than structured. It turned out to be fine. If I were to do it again, I would go for planned randomness. With my nails at their current length, six tiles is just too much. I don’t plan to let them get much longer, so I’m thinking random is winner. And actually, if I’d watched eunique nails’ tutorial again before I did this manicure, I likely would have lined the colors up on one sponge rather than using three different sponges for each color combination. I’ve seen another tutorial where the gradient was applied randomly using multiple small sponges, and I thought that was the technique eunique nails had used her design. Additionally, the Mahogany Magic ended up being much darker than I’d originally envisioned. I wasn’t sure the stamp was going to show up against it. It turned out fine, but ideally, there’d be a larger difference in hue.
Finally, some of the stamps didn’t fully cover my nail, so I tried to add more stamp. That didn’t work out well. You can really see it on the thumb in the image above.
So that’s it lovelies. I can’t wait to hear what you think. Be sure to vote anonymously and leave a comment below.
Thanks for reading. Stay beautiful!
About the Author: Tanya Michelle
Subscribe
If you enjoyed this article, subscribe to receive more just like it.
Subscribe to our newsletter


